




Planning a trip sounds exciting until you try to organize it. You save places, open maps, check timings, and still feel stuck. I have had trips where I wasted hours just deciding what to do next, and once I walked across a city to a place that was closed.
A simple system fixes that. This guide shows you how to build a travel itinerary that works in real life, with clear steps, practical examples, and smart planning habits that save time and reduce stress.
Itinerary building is one stage in the full process of how to plan a trip step by step..
Tip: Build your itinerary around areas, not random attractions. When places are close together, your day feels smoother and you save time.
What is a Travel Itinerary?
A travel itinerary is a simple plan that shows what you will do each day of your trip. It helps you organize your time, move smoothly between places, and keep important details in one place.
A good itinerary answers three basic questions:
- Where you are going?
- What you will do?
- And how you will get there?
It does not need to be rigid. It just needs to be clear enough to guide your day. Finish your travel budget planning before adding expensive tours, long transfers, or extra hotel nights.
Important: Your itinerary should guide your trip, not control it. Always leave room for flexibility.
Why You Need a Travel Itinerary
A trip without a plan often leads to wasted time and missed chances. You may spend more time deciding what to do than actually enjoying the destination. Even a basic itinerary makes your trip easier to manage.
A simple itinerary helps you:
- Save time
- Stay organized
- Avoid missing important places
- Reduce stress
The goal is not to control every minute. The goal is to make your trip easier, more balanced, and more enjoyable.
Why Most Travel Itineraries Fail
Travel plans often look good on paper but fall apart in real life. This usually happens because people focus on adding more places instead of building a smart route with realistic timing.
Most weak itineraries fail because they:
- Add too many places in one day
- Ignore travel time
- Skip opening hours and ticket checks
- Leave no room for breaks or changes
A good itinerary is not about fitting in everything. It is about choosing the right places and arranging them in the right order.
I made this mistake on one of my early trips. I added too many places in one day and ended up skipping half of them because I ran out of time.
Note: A good itinerary should feel easy to follow even when you are tired or running late.
The Simple Method I Use for Every Trip
This method keeps planning simple and repeatable. Instead of starting from scratch every time, you follow a clear structure that works for almost any destination, whether it is a city break, road trip, or longer vacation.
List → Map → Group → Plan → Adjust

- List places
- Map them
- Group nearby spots
- Build your day
- Adjust for time and comfort
Once you use this system once, it becomes much easier to plan future trips without feeling overwhelmed.
My Simple Travel Planning Method
I use this method for every trip. First, I list all places. Then I map them and group nearby spots. After that, I build each day around 2–3 main places and leave space for travel and breaks. This keeps my itinerary clear and easy to follow.
If you have not selected the right place yet, use our guide to choosing a travel destination before building your list of attractions.
Step-by-Step Guide to Build a Travel Itinerary
Step 1 – List All Places You Want to Visit
At this stage, your job is to collect ideas, not organize them. Think of this as building your pool of options. A bigger list gives you more freedom later when you decide what truly fits your trip.
Add anything that looks interesting:
- Attractions
- Parks
- Restaurants
- Local experiences
Do not filter too early. It is easier to trim your list later than to go back and restart the research process.
Step 2 – Pick Your Must-See Places
This step helps you set priorities early. Once you know your must-see places, it becomes much easier to shape each day around them. Everything else becomes optional instead of stressful.
Keep it simple:
- Choose 1 to 2 major places per day
- Treat the rest as flexible stops
This one step removes pressure and keeps your trip realistic from the start.
Step 3 – Check Key Details
This step protects your itinerary from the most common mistakes. Many trip plans fail because people skip basic checks like opening hours, visit length, or ticket rules. A few minutes of research here can save you hours later.
Always check:
- Opening hours
- Ticket prices
- Time needed
- Best visiting time
This is also the point where you can spot timed-entry attractions, weekly closures, and places that need advance booking.
Step 4 – Map Everything (Google Maps + My Maps)
Mapping your places turns a random list into a visual plan. Instead of guessing distances, you can see how places fit together and which ones belong in the same day.
Google Maps
Save Places in Google Maps
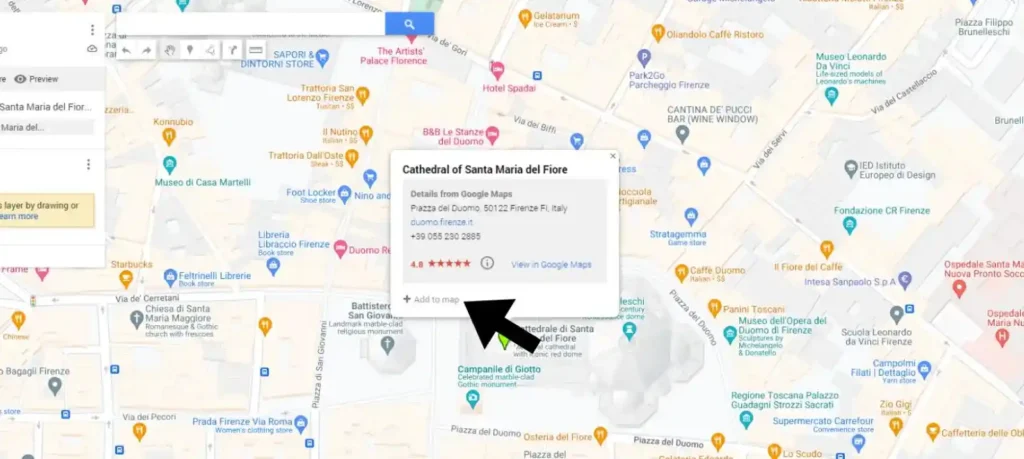
Use Google Maps to save places quickly.
- Search for a place
- Click on it
- Tap “Save”
- Add it to your list
Note: This helps you build your list of locations in one place.
View All Saved Places
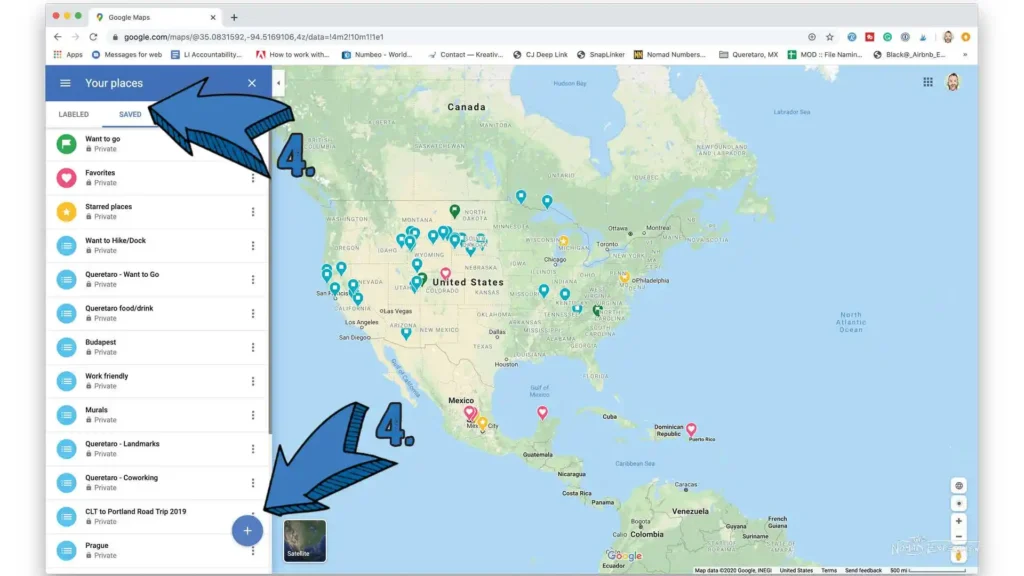
Once you save places, you can view them together.
- Open “Your places”
- Check saved locations
- See how they are spread across the city
Note: This helps you understand distance and quick planning.
Organize with Google My Maps (Advanced)
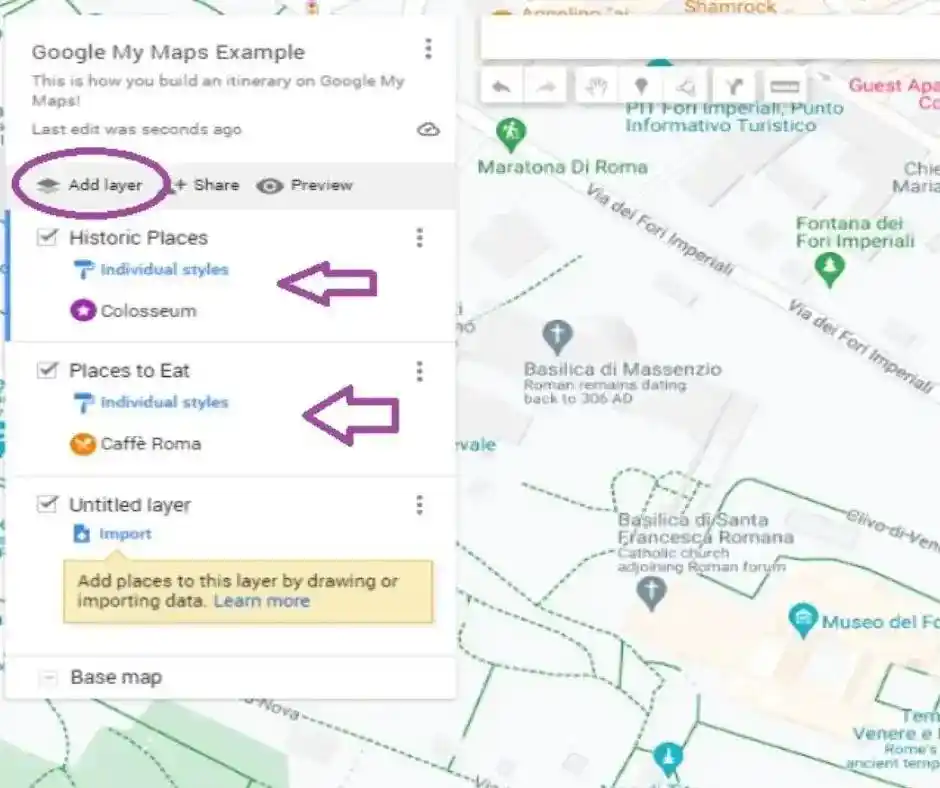
If your trip is longer, use Google My Maps.
- Create a new map
- Add layers like food, attractions, hotel
- Group places into categories
- This makes your itinerary much easier to organize.
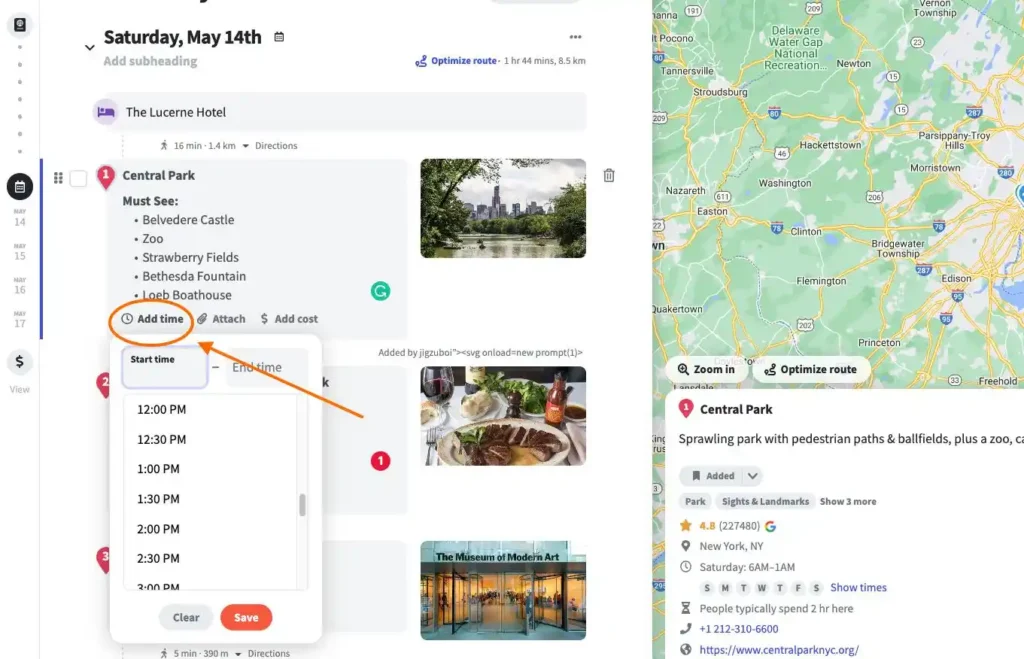
Note: If your trip is simple, Google Maps may be enough. If you are planning multiple days or many stops, My Maps gives you more control.
Important: Once your places are on a map, it becomes much easier to group nearby stops and avoid wasting time.
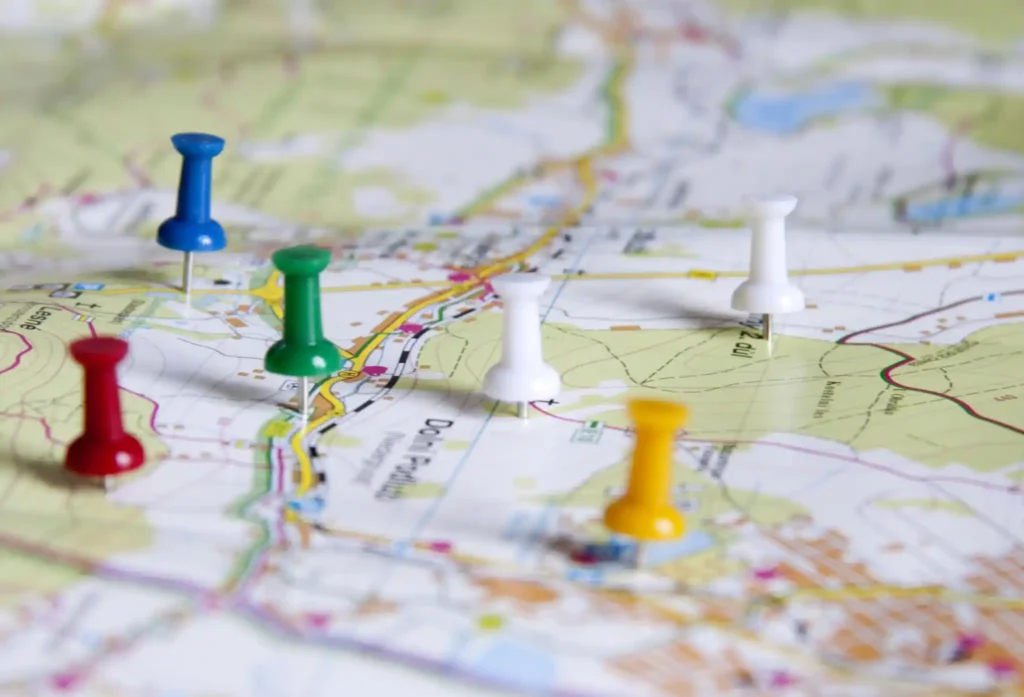
Step 5 – Group Places by Area
This is where your itinerary starts to make sense. Instead of jumping between distant locations, you focus on one area at a time. That keeps your day smoother and cuts down on wasted travel time.
Do this:
- Find nearby places
- Put them in one day
- Avoid long travel gaps
This one habit often makes the biggest difference between a stressful day and a smooth one.
Step 6 – Build Your Daily Plan
This step turns grouped locations into a usable schedule. The goal is to build a smooth flow from morning to evening without making the day feel packed or rushed.
Use a simple structure:
- Morning → main place
- Afternoon → nearby activity
- Evening → relaxed plan
A balanced day almost always works better than a packed one, especially if you are traveling for several days in a row.
Step 7 – Add Travel Time and Buffer
Travel rarely goes exactly as planned. Crowds, delays, weather, and transit issues can affect your schedule. Buffer time keeps your plan realistic and easier to follow.
Always include:
- Travel time between stops
- 30 to 60 minutes of buffer when needed
- Rest time during busy days
This is what keeps a good-looking itinerary from falling apart by noon.
After a few trips, I realized that adding buffer time makes a huge difference. Without it, even a good plan starts to feel stressful.
Step 8 – Add One Backup Option
Even strong plans need flexibility. A backup option gives you something to switch to if the weather changes, a place is closed, or you finish earlier than expected.
Choose a backup that is:
- Nearby
- Easy to reach
- Flexible on timing
This small step adds confidence to your trip because you know you have another option ready.
Step 9 – Keep It Flexible
A rigid itinerary often creates pressure. Travel should feel enjoyable, not controlled by a strict schedule. A good plan gives you structure while still leaving room to adjust.
Leave space for:
- Exploring
- Rest
- Changes in mood or weather
This is what keeps your itinerary useful instead of stressful.
Real Example: Good vs Bad Itinerary
Seeing the difference between a weak and strong itinerary makes the planning process much easier to understand. Small changes in structure can completely change how your day feels.
Comparison
Bad Plan: Too many places, long travel gaps, no breaks, no backup.
Better Plan: Three main places, same area, time between activities, one backup option..
Simple changes like grouping by area and leaving space between stops usually improve the whole day right away.
Example: 1-Day Travel Itinerary
This example shows how a simple day plan looks in real life. It follows the same structure from the steps above and keeps the day balanced instead of overloaded.
Day 1 – New York City
- 9:00 AM – Central Park
- 11:00 AM – Museum
- 2:00 PM – Lunch
- 4:00 PM – Times Square
- 7:00 PM – Dinner
The places are easy to connect, the timing is realistic, and the day still has room to breathe.
Example: 3-Day City Itinerary
A multi-day plan works best when each day has a clear focus. This helps you avoid zigzagging across the city and makes your trip easier to follow.
- Day 1 → Main attractions
- Day 2 → Culture and museums
- Day 3 → Local areas and relaxed time
This structure keeps the trip balanced and gives each day a clear purpose.
What to Include in Your Travel Itinerary
A complete itinerary saves you from checking different apps and emails again and again. The more useful details you keep in one place, the smoother your trip will feel.
Include details like:
- Hotel details
- Flight information
- Attraction timings
- Ticket links
- Travel time
- Food options
- Emergency contacts
These small details are often the difference between a smooth travel day and a frustrating one.
Simple Travel Itinerary Template
Free Travel Itinerary Template
Plan your entire trip in one simple sheet. Organize places, timing, and travel details without confusion.
A simple template keeps your plan clear and easy to update. You do not need a complex system. A basic format is enough if it keeps all the important information in one place.
Basic format:
- Time
- Activity
- Location
- Travel method
- Notes
You can keep this in Google Docs, a spreadsheet, or even a notes app. The format matters less than the clarity.
Best Tools to Plan Your Itinerary
Different tools fit different planning styles. Some are simple and fast, while others give you more control. Start with the easiest option that fits your trip.
The best travel apps can help you store bookings, map daily routes, and keep your itinerary available offline.
Google Maps – Simple and fast- Check places, Check route, Easy to use.
Google My Maps – Better for detailed trip planning-Create layers, Organize locations, Plans multi-day trips.
Wanderlog/TripIt – Good for full itinerary building, Good for group trips, Keep bookings together.e
Note: You can start simple with Google Maps and move to a more detailed tool later if your trip gets more complex.
Plan for Comfort and Real Travel
A good itinerary should match your energy level, travel style, and real-life conditions. Planning too much without thinking about comfort can make the trip feel tiring instead of enjoyable.
Think about:
- Walking distance
- Travel time
- Weather
- Rest breaks
A comfortable plan almost always leads to a better trip than a packed one.
I used to plan full days without thinking about rest. Now I keep my schedule lighter, and the trip feels much more enjoyable.
Types of Travel Itineraries
Different trips need different planning styles. A city break, road trip, and international vacation all work best with different pacing and details.
- City trip → nearby places and walkable routes
- Road trip → route planning, fuel stops, and break points
- Family trip → shorter days and more breaks
- International trip → document checks, airport timing, and arrival-day pacing
Matching your plan to the type of trip makes the whole itinerary more useful.
For a driving holiday, follow our guide on how to plan a road trip with realistic daily distances and rest stops.
Common Travel Itinerary Mistakes to Avoid
Learning from common mistakes helps you build a better plan from the start. Most itinerary problems are easy to avoid once you know what to look for.
- Too many places in one day
- Ignoring distance
- Skipping timing checks
- No rest time
- No backup plan
Fix these issues early and your itinerary becomes much easier to follow.
Tips to Make Your Itinerary Better
Small changes can improve your plan a lot. These simple habits help you build a smoother trip without making the itinerary too detailed or hard to manage.
- Start early
- Book popular places in advance
- Keep routes simple
- Mix busy and relaxed activities
A balanced plan almost always works better than a packed one.
FAQ – Travel Itinerary Planning
These are common questions travelers ask while planning. Simple answers help you stay clear and keep moving without getting stuck in small decisions.
How many places should you visit in one day?
Two to four places is a good range for most travel days. The right number depends on travel time, visit length, and how active you want the day to feel.
How detailed should a travel itinerary be?
Keep it simple but useful. Add key timing, locations, transit method, and notes that help you move through the day with less stress.
Can you travel without an itinerary?
Yes, but it often leads to wasted time and missed chances. Even a light itinerary gives your day direction and makes decision-making easier.
How long does it take to plan an itinerary?
A short trip may take a few hours to plan well. A longer trip may take a few days, especially if you are comparing routes, timings, and booking details.
Final Thoughts
Planning a trip becomes much easier when you follow a simple system. You do not need a perfect itinerary. You just need one that is clear, realistic, and easy to follow.
List your places, map them, group nearby stops, and build your days with enough space for travel and rest. Once you start planning this way, trips feel smoother and far less stressful. Use the travel planning checklist to confirm bookings, documents, packing, and transport before departure.
